Show More Posts On Home Page Of Blogger Blog
Blogger Basics

If you are new to blogger, then you must have seen that there are only 5 posts on the Home page by default. However, not everyone wants just 5 posts on the Home Page. If you want to display more than 5 or less than 5 posts on the Home Page of your Blogger blog and are clueless about it, then read this simple tutorial.


Step 1:
Login to your Blogger account. Now visit the Layout section of the Blog, find the Blog Posts section and click on Edit

change number of Blog posts


Step 2:
Now you will see a box with many options. At the top you will find the option "Number Of Posts On Main page". Change the number according to your choice.

change number of Blog posts


Now click on Save and check your blog.

0 comments:

Add Feedburner RSS Subscriber Counter To Blogger Blog

Feedburner Subscribe by email


In the previous post we learnt how to Add Feedburner Email Subscription Box To Blogger Blog. In this post, we will learn how to add the Feedburner Feed Count. Now that you have added RSS subscription options to your blog, its important that you showoff your feed circulation to everyone. It is very easy to add this for blogspot users as a Widget/Gadget/Plugin.

To add the Feed Count to your Blogger blog, follow these simple steps


Step 1:
Login to your Feedburner account. Once you do that select the feed for which you want to display the RSS Subscribers stats.

Feedburner Subscribe by email


Step 2:
Now you will see many options. Click on Publicize option. In it click on FeedCount option and click on Activate. Once you do that you will be able to choose the colour of the Feedburner Feed Counter. Choose the colour that you want and click on Save.

Feedburner Feed Count


Step 3:
After doing that, you will see an option Copy this HTML. Make sure that you change the option from Typepad to Blogger and click on Go.

Feedburner Feed Count


Now select the blog to which you want to add the Widget and refresh your blog. The RSS Feed Count will be visible on your blog.


0 comments:

Remove FeedBurner Image From BuzzBoost

Buzzboost

BuzzBoost is an awesome service from FeedBurner. If you use BuzzBoost, then you must have seen the small Headlines By FeedBurner image below the widget.

Buzzboost

However everyone doesn't want to display the image in the widget. So to remove it, you have to add a small piece of code in the widget just below the BuzzBoost code as seen below. Just paste the code in bold below your buzz boost code.

<script src="http://feeds.feedburner.com/CoolTricksNTips?format=sigpro" type="text/javascript" ></script><noscript><p>Subscribe to RSS headline updates from: <a href="http://feeds.feedburner.com/CoolTricksNTips"></a><br/>Powered by FeedBurner</p> </noscript>


<style>
#creditfooter
{
display: none;
}
</style>

Thats it, now click on Save and check the widget again, the Feedburner image wont be there. If you want to see an example of a BuzzBoost widget without the image, then check the sidebar of this blog. The Cool News widget is using BuzzBoost.

0 comments:

Add Feedburner Email Subscription Box To Blogger Blog

Feedburner Subscribe by email


One of the major thing that shows the popularity your blog is the RSS Subscribers Count. The more the subscribers you have , the more popular your blog is. Most bloggers want more subscribers to their blogs. And the only way to get more subscribers is to add a RSS Subscription box to your blog.

If the blog readers like your posts, there is a higher possibility of them subscribing to your feeds. This helps to increase the popularity of your blog. Adding email subscription option to blogger blog isn't that tough and hardly takes few minutes. Below are some simple steps which will help you to add Subscription by Email widget/gadget/plugin for blogspot users.


Step 1:
You need to burn your feed with Feedburner. If you haven't yet done it then read Adding Feeds To Your Blog . After doing that, select the feed that you want to add the email subscription option

Feedburner Subscribe by email


Step 2:
Now you will see many options. Click on Publicize option. In it click on Email Subscriptions option

Feedburner Subscribe by email


Step 3:
Now click on Active option

Feedburner Subscribe by email


Step 4:
Once you have activated the email subscription option, select the type of widget that you want. You can choose either a Text Link or an Email Subscription box. Also select Blogger as the option in place of Typepad

Feedburner Subscribe by email


Now click on Go and add the widget to your Blogger blog. Refresh your blog and wait for people to subscribe to your feeds.


0 comments:

Add BuzzBoost To Blogger Blog

Add Buzzboost to blogger blog


BuzzBoost is a nice service from FeedBurner which allows you to promote your feeds on the same blog or even other blogs. Its a nice way to tell visitors on one of your blog about your other blog. Or you can even use it as a Recent Posts widget. Even I have used BuzzBoost on this blog. You can see the Cool News section on the sidebar which is using BuzzBoost.

Adding BuzzBoost to your blogger blog is a pretty simple thing to do. First visit Feedburner and click on the feed you which you want to use BuzzBoost. However, if you havent yet created a feed, then I recommend that you read Adding Feeds To Your Blog first.

Now that you are ready and have clicked on the feed, you will see a number of options like Analyze, Optimize, Publicize etc. Click on Publicize and in it you will find the BuzzBoost option

Add Buzzboost to blogger blog

There you will find many options like the number of feeds to display,  Opening the links in a new window, displaying the favicons and many more. Just select the options that you want in your BuzzBoost widget and click on Activate.

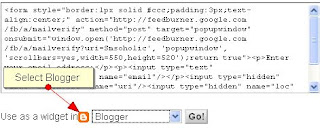
On clicking it, you will see some code and below it Use as a widget in option. Select Blogger and click on Go

Add Buzzboost to blogger blog

Now you will reach the Add page Element page. Select the blog on which you want to add the widget and  click on the Add Widget button.

Add Buzzboost to blogger blog


Thats it, now the BuzzBoost widget has been added to your blogspot blog.

0 comments:

Adding Photos To Blogger Blog Posts

Blogger Basics


Adding photos to Blogger blog posts is a very simple thing to do. Blogspot users don't have to upload the photos to any other image hosting service for posting images on Blogger. Blogger uploads your images to Picasa.


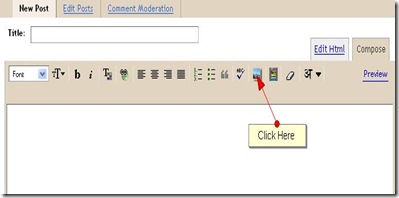
To upload an image on Blogger, Create a New Post. There, among the list of options, you will see Add Image option. Click on it.


upload images to blogger


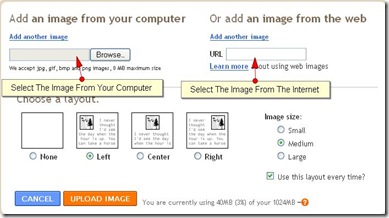
You will see a box having many options


upload images to blogger1

You can choose the image from your computer or paste the URL of the image from the net. You can also choose whether you want the image to appear on the left, right or center of the blog post and the size of the image. Once you have chosen the options, click on Upload Image. Now check the blog post, the image will appear in the post.


0 comments:

Adding HTML And Javascript To Blogger

Blogger Basics


If you are new to Blogger and you don't know how to add some HTML or Javascript code to your Blogger blog, then you have reached the right place. It is very easy to add HTML and Javascript to your blogger blog. Just follow the simple steps.


Step 1:
Login to your Blogger Account. You will be taken to the Blogger Dashboard. You will see a list of blogs or only 1 blog. It depends on the number of blogs you have. Click on Layout.


Blogger Basics


Step 2:
Now you have to click on Add A Gadget link.


Step 3:
When you click on Add A Gadget, you will see a list of options. Click on HTML/JavaScript.


Step 4:
When you click on HTML/JavaScript option, you will see a box. Just paste the HTML/Javascript code in the big box and give a Title for it. You can also leave the Title empty. Now click on Save and check your blog.


0 comments: